So maybe you have been an aquarium hobbyist for years, starting with freshwater tropical, moving on to freshwater planted and now you are ready for the next step, or you are just getting into the aquarium hobby and you want to jump right in to a saltwater aquarium. This type of aquarium setup is demanding and there is so much information out there that it’s a little overwhelming. Every hobbyist has an idea of what’s right and wrong when it comes to saltwater setups. However one thing is common among them all. There are agreed upon similarities when setting up this type of aquarium. My hope, in this article, is to explain those common similarities allowing you to get started and then figure out what works for you and what doesn’t as time goes on.
So first I am going to list all the items that will be needed to setup a successful saltwater reef aquarium. Then I will briefly describe the reason for their necessity for a successful reef aquarium setup. All of the items I will list are highly recommended and skipping over even one of them to save some money is only going to add frustration to the whole process of setting up and maintaining a saltwater reef aquarium. Some of the items I list will be general terms but when I begin to write more about them I will be more specific and even offer suggestions as to alternatives.
Items needed for Reef setup:
1) Aquarium, Stand, & Backing
2) Lighting
3) Filter, Pump, & Filter Media
4) Protein Skimmer
5) Chemical Filtration Reactor
6) Heater &/or Chiller
7) Saltwater Mix with Premix System
8) Live Rock & Live Sand
9) Substrate & Reef Mud
10) Circulation Pumps & Wave Maker
11) Auto Top Off System
1) Aquarium, Stand, and Backing
This is the most obvious component to setting up a successful saltwater reef system. However most people wonder about the best size of such a setup. Here is a link to common fish tank sizes and characteristics. First off, I would say the larger the aquarium the better since water chemistry is key in a successful reef aquarium setup. In small aquariums, water chemistry can change drastically and quickly and it is in one’s best interest to keep the chemistry aspects as stable as possible, thus bigger is better. Although bigger is better, I would also stay away from tall tanks since lighting is a key component in reef aquaria. Taller tanks tend to refract a fair amount of beneficial light before it is able to penetrate all the way to the bottom of the tank. I would recommend starting with a 55-gallon aquarium as the minimum size. These tanks are typically 48” x 13” x 21” in size. Although this size of tank is quite common in pet stores there is going to be one main difference in a saltwater aquarium with the setup I recommend. There will need to be holes drilled in the bottom of the tank surrounded by an overflow box. These holes will have bulkheads installed for connection to the filtration system’s input and return. Glass aquariums with holes will be expensive since a professional must drill these holes. I would recommend that the aquarium be glass rather then acrylic because during cleaning there is a high chance of scratching the acrylic. Although the scratches can be buffed out. It all depends on where the scratches are. For ones lower in the tank, that repair process can be next to impossible without endangering the reef ecosystem.
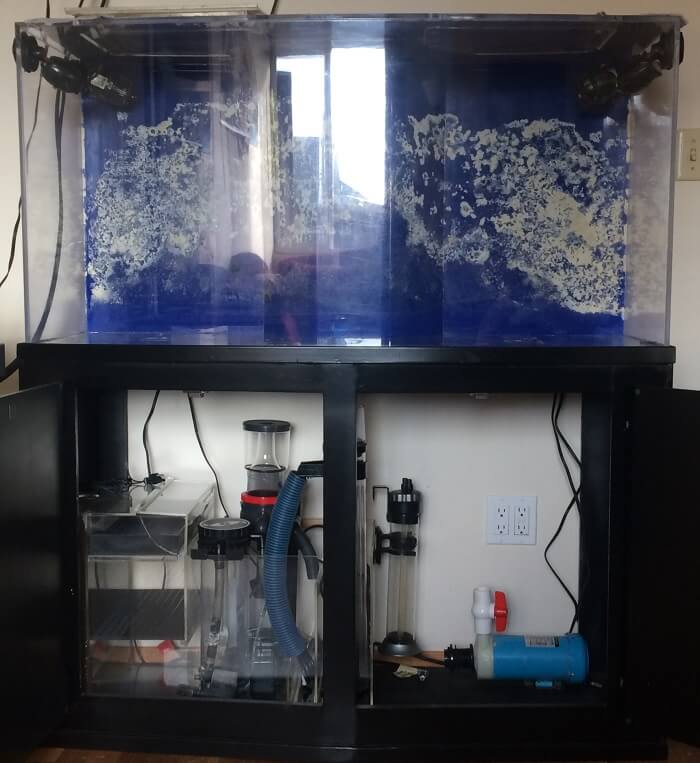
When it comes to a stand for the aquarium, I would recommend buying the accompanying stand. However make sure there is wide comfortable access and maximized amount of space. Support beams in the middle of the stand will create problems. Much of the filtration is going to be within the stand and the need to access this area when doing maintenance is going to be common. Another point I would like to make about the stand is consider the filtration mechanism first and know its dimensions, rather than buying the stand first and figuring out later what can fit under there.
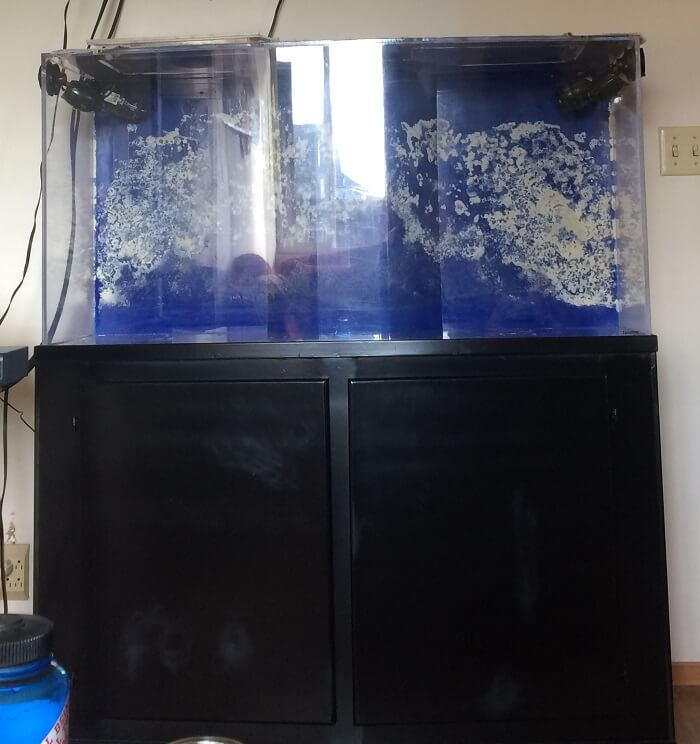
Finally within this category is the backing. It’s the scenery or flat color that is typically fixed to the back of the aquarium. Many acrylic aquariums with the overflows and holes already in them come with a standard backing in blue or black. Glass aquariums typically do not have this option and so a backing is necessary to conceal the electrical cords that will hang along the back of the aquarium. Backings come in solid colors or sceneries but I recommend black or blue as the best option for a couple of reasons. First, the blue or black tend to really bring out the colors from the fish and corals in the reef ecosystem. Secondly, the flat blue or black is better then the scenery backing because there will be a necessary algae called coralline algae that will grow over everything within the aquarium and eventually the scenery backing will be covered and obscured. If the backing is not part of the aquarium, I highly recommend attaching it to the back of the tank before beginning any setup or water fill. Thoroughly clean the back of the aquarium to remove smudges, finger prints, and dust before attaching the backing. Use heavy duty clear plastic packing tape and make sure a piece of tape runs along the entire top of the tank when attaching the backing. This will ensure no water droplets or salt creep will get between the back of the aquarium and the backing.
My reef aquarium is a Tenecor 80 gallon bow front acrylic aquarium. The back of the aquarium is blue. The aquarium sits atop a black, specially designed aquarium stand suited for my filtration needs under the tank. The aquarium is fitted with Lifeguard Aquatics Bulkheads, one 3/4″ and one 1″, return and overflow-to-sump, respectively. Tenecor is currently out of business but there are many aquarium manufacturers that make quality aquariums such as Tenecor.
In addition to the 3/4″ and the 1″ links I already supplied, here are two more sizes if doing a smaller or larger tank than what I have suggested in this section.
2) Lighting
Besides the aquarium and filtration, lighting is the single most important aspect for a successful reef aquarium. There are many types of lighting but I definitely like to go with LED lighting. There are several reasons I find LED lighting the best. The main reason for being the best is economic efficiency and low heat output. LED lights use very little electricity to run, this keeps the electrical bill low, and due to this efficient use of electricity. LED lighting puts off a minor amount of heat. This lack of heat output is good because that heat won’t go into heating the water in the aquarium. This can be a real problem with all the heat the pumps will be dispensing into the water column while they run. Another benefit to LED lighting is not having to replace the LEDs. These lights typically have a 50,000-hour lifespan, meaning the LEDs will continue to run for 11 years at a 12-hour light cycle. The Photosynthetic active radiation (PAR), a term I will get into below, will not decrease over that period of time unlike fluorescent tubes, halide bulbs, or power compact fluorescents. Finally, another great benefit to LED lighting is most manufacturers are designing these units with built in timers, dimmers, and dynamic effects.
When it comes to LED lighting there are some things to keep in mind when choosing the best unit for the reef ecosystem’s needs. Mainly, the types of corals and their photosynthetic needs will be the predominant factor when choosing the best lighting.
There are three main groups of corals:
- Soft
- Large Polyp Stony (LPS)
- Small Polyp Stony (SPS)
Small Polyp Stony (SPS) require the most intense lighting available. First and foremost, on the lighting of interest, take note of the white light Kelvin scale, or K, which should be in the 10,000K to 12,000K range. However, now there are 14,000K lights entering the market. Also take note of the blue light nanometer scale, or nm, and be sure it is in the 420nm to 460nm range.
Back in the day before LED lighting systems it was usually accepted that the first two coral groups (Soft and LPS) needed about 3 to 4 watts of incandescent light per gallon and the SPS corals needed 4 to 5 watts per gallon. However, now with LEDs, the wattages just don’t go that high but some manufacturers will supply an equivalency rating comparing their LED wattages to that of incandescent light wattage. If they do, then simple math will answer whether the LED lighting of interest is appropriate for the desired reef ecosystem. If there is no equivalent comparison to wattage, then pay attention to the PAR rating for that light. PAR stands for Photosynthetic active radiation, and it is the measurement of light for photosynthesis usable by the corals in the reef. The deeper the water the lower the PAR rating will be, and it will be lowest at the bottom of the aquarium, which is why I cautioned against tall aquariums for a reef setup. The higher the PAR the better it is for the reef especially if getting into SPS corals. These corals typically require a PAR rating above 200.
Lastly, when it comes to searching for the best lighting system, keep in mind, it is best to get a light that stretches from end to end of the aquarium. Some lighting manufacturers will mention their light is for aquariums between 24 to 36 inches long, for instance. Keep in mind, this light will only go end to end on a 24” aquarium and there will be mount extenders that allow the light to be mounted across a 36” aquarium. The problem with a smaller light than the length of the aquarium, is there will be shadow zones on either end. It may be difficult to get many types of corals to grow in these zones. These shadow zones effectively reduce the total area within the aquarium for coral placement.
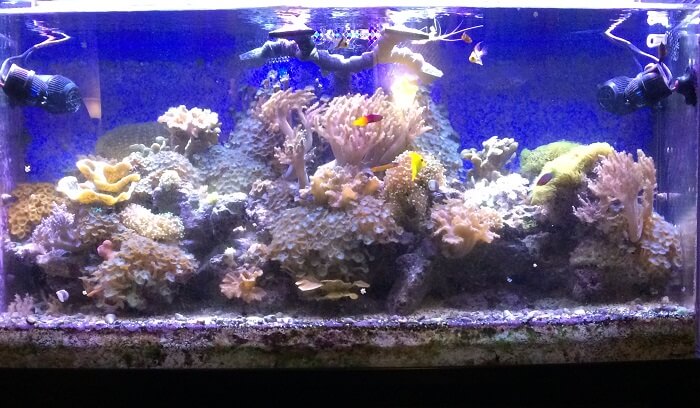
I am currently using two 48” Current USA Orbit Marine Pro LED Fixtures on my reef aquarium. In this reef I have Soft, LPS, and SPS corals.
The link below is the light I propose using, but I have only found it available as of now in the 24″ to 36″ size.
However, while the link below is not the exact product I have on my tank, I have this product on several of my current saltwater client aquariums and it works equally as well but may not support some of the more intense lighting required by corals some hobbyists may want.
The link below is for another lighting system that is new and that integrates several components I talk about throughout this article. Anyone, novice or expert, may find this lighting system provides a level of realism within their saltwater reef tank the other light options don’t provide.
3) Filter, Pump, and Filter Media
In the section about choosing the right aquarium, I mention looking for aquariums with pre-drilled holes and overflow boxes. The reason for this is the type of filter I recommend as being ideal for a reef system, and that is an open-air sump, or wet/dry filter. This type of filter is gravity fed by the water flowing through the overflow boxes in the aquarium and returned to the reef with the use of a single pump. There is typically space for the return pump, filter media, the heater, a protein skimmer, although some sumps have a built-in protein skimmer, a chemical filtration reactor, and additional space for other smaller items. If the sump being researched has limited space within it then some of these items can be placed or mounted outside of the sump e.g. the return pump, chemical filtration reactor, and in some cases the protein skimmer; but in the latter two items a pump for each will still be required inside the sump to feed these two apparatuses individually. However, I personally like to put everything within the sump with the return pump on the exterior of the sump connected with a bulkhead and pipe.
There are three things to keep in mind when it comes to choosing the correct sump:
1) size,
2) built-in protein skimmer options, and
3) bulkhead fitting size.
First, bigger is better when deciding on the correct sump since a common motto in the aquarium hobby is, “there can never be too much filtration” and this is definitely true when it comes to saltwater reef setups. The bigger sump will provide space for all of the above-mentioned gear. A larger sump will have more space for additional filtration media, which in a reef system tends to be additional live rock. The larger sump will also have a volume of water within it while operating and this can counterbalance the water displacement once substrate and live rock are added to the aquarium. In a standard 55-gallon tank with the optimum substrate and live rock, water displacement can drop the total volume by 5 to 10 gallons. However, with an appropriately large sump, that lost water displacement can be regained.
The sump size will have a gallon and flow rating for aquariums of such and such a size e.g. this S100 sump is rated for aquariums up to 100 gallons and has a flow rate of 300 gallons per hour. In this situation I would always recommend getting the next step up. If you have a 55-gallon aquarium, get the sump that’s rated for a 75 or 100-gallon aquarium as long as there is space within the stand; remember the motto, “there can never be too much filtration.”
Second, does the sump have a built-in protein skimmer? I tend to stay away from built-in protein skimmer sumps because the protein skimmers tend to be less effective then stand alone skimmers. In the following section I will get into protein skimmers but right now I will say if the built-in protein skimmer is not of the pinwheel impeller type then consider a different sump.
Third, the bulkhead fittings, not only in the aquarium, but also in the sump, are important because those are what will be used to attach your pump to the sump and ultimately back to the aquarium. The bulkhead fittings correlate to the appropriate pump size for the sump and volume of the aquarium. The pump should be circulating the entire volume of water within the reef through the sump approximately 10 to 15 times every hour. So for instance, if there is 55 gallons of water in the aquarium, the pump needs to have a 600 to 800 gallon per hour flow rate. This may seem extremely high but take a look at a natural reef in the wild and try to understand the wave and tidal action that moves the water across it in a 24-hour period of time. The pump that is chosen will thus have pipe size numbers for the intake and output and it is extremely important those pipe sizes are maintained throughout the plumping of the reef system. Therefore, the bulkhead fittings in the aquarium and sump must match that of the pipe sizes of the intake and output of the correct pump.
Although I mention a bit about the correct pump in the above text, for the correct sump I do have a point I would like to make. If you want to put the pump within the body of the sump, then obviously make sure the pump is submersible. I do like the option of submersible pumps within the sump because the water that surrounds the pump will help reduce vibrational noise. In the case of external pumps attached to the sump, there can be a bit of vibrational hum. For some people this can be a distraction from enjoying their reef system, especially if that system is set up in the bedroom or in the living room near the TV. There are ways to reduce the vibrational noise but you will never rid the system of it entirely.
Lastly, is to consider the type and amount of filter material needed for the sump that will be appropriate for the reef setup. Most manufacturers will provide a filter media in their sumps that gives it the rating it has for a certain aquarium size. Unfortunately, certain types of media work well in the early time period of running the system but become a serious problem later. I would recommend staying away from bio-balls, ceramic cylinders, and bio-bale media for reasons I will explain. The bio-balls eventually get clogged with calcium deposits that only a soak in vinegar can remove which will kill all the beneficial bacteria your system has cultured on those balls. The ceramic cylinders begin to break down within the corrosive conditions of saltwater and become pitted, break, and crumble. The bio-bale, which is a better media than the first two, eventually becomes brittle and fragments into pieces, rather then maintain its noodle like appearance throughout the lifetime of the reef system. Realistically, the only media I find ideal for the reef system is live rock, whether it remains as a few single large pieces or a single large piece broken up into several smaller pieces. When I get to the section about live rock there will be more of it then can fit in the aquarium and therefore this can be put into the sump as filter media. In addition to using live rock as filter media I also use filter bags with shells, crushed coral, Kent Marine Nitrate sponge media, or very coarse aragonite to fill in the gaps the live rock creates when placed in the sump.
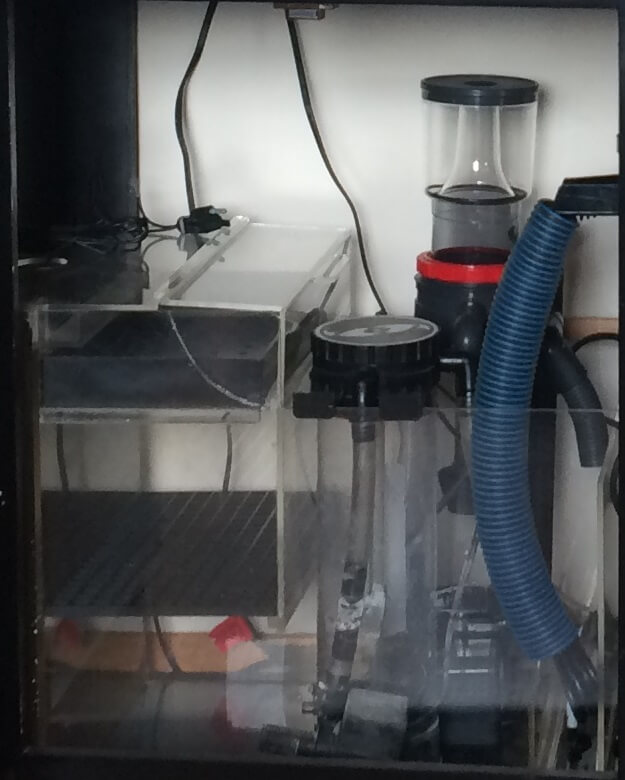
Although I am unsure of the exact brand of sump I am using on my reef aquarium, it is very similar to CPR Aquatics, Inc. CR series wet/dry filters which I have experience with, and I like the versatility, design, and quality of this brand. The return pump for my setup is an external Gen-X PCX-40 (Mak IV) Water Pump. Although I like the quality of this product and its durability, I find it to be a bit on the noisy side. I have my sump packed with as much live rock as can fit, submerged and I have four 8” x 12” South Ocean Five nylon filter bags with two Kent Marine Nitrate Sponge (3.3lbs.) media evenly distributed between each of the bags. I have removed the filter floss filter media from the sump tray and have used all of the empty hermit crab and saltwater snail shells I have collected over the years of working on saltwater fish aquariums, in there instead.
Below are a series of links to a number of different sized CPR wet/dry filters, in order as to size, from small to large.
While I have no direct knowledge of Eshopps Inc. wet/dry filters, they seem comparable to CPR and other manufacturers I have seen and used, and they also sell many other saltwater related aquarium products, so it might be a nice starting point for a new tank setup.
Amazon doesn’t seem to sell the exact pump I use, but because there are so many different type of pumps, submersible or external, with a plethora of flow rates that all depend on what an individual wants to do with their setup and how big it is.
Danner Pondmaster Pumps are a reliable pump that can either be installed in-line or submerged into the Sump. The pump is quite long lived, durable, and the impeller can easily be replaced and is quite affordable.
These filter bags are the same brand I use, but generally speaking, bags are bags.
4) Protein Skimmer
I briefly touched base on a proper protein skimmer, in the filter section above, called a pinwheel, or needle wheel, impeller protein skimmer. But many people don’t know or understand the concept of a protein skimmer so I would like to explain that first. Then a better understanding can be made for the type of protein skimmer I recommend.
If the ocean is near, I would ask take a moment and watch the waves crashing. If there is no ocean nearby, find a video online that shows wave action on the beach. While watching the waves crashing onto the beach be aware of foam forming along the water’s edge as it ebbs up onto the sand before it recedes back into the ocean. Also take note, some of the foam being left behind as the water returns to the ocean. This is nature’s protein skimmer in action.
Proteins, as they are referred to, are actually made up of a lot of stuff e.g. fish waste and uneaten food, dead phytoplankton, micro- and macroscopic dead organisms and algae, bacteria, and trace elements, to name a few. All of these things have an affinity for air bubbles and when exposed to them will attach to the bubble itself, creating foam that can then be collected and discarded before it creates pollution issues in a reef setup.
The process in which this occurs is called foam fractionation. During this process, a column of water is exposed to micro air bubbles created by a pump that fractures up the air it draws in from an airline. The longer the water is exposed to these air bubbles the more stuff the bubbles attract, the thicker the foam becomes, and the easier it becomes to collect. Unfortunately, exposing the water for a prolonged period of time can be difficult with the room and space we have to work within the aquarium stand. It would mean our protein skimmer would have to be very tall. So to overcome this problem, protein skimmers try to create a massive volume of micro air bubbles. The more bubbles the protein skimmer can create, the better it is in removing the proteins dissolved in the water column.
What I have explained above leads me into why I recommend a pinwheel impeller protein skimmer. For one, this type of skimmer creates a massive amount of micro bubbles and is thus very efficient at protein removal. Also, the water level within the skimmer body can typically be adjusted allowing for removal of a greater ratio of protein to water. If the protein skimmer is not adjustable and is removing a fair amount of water i.e. the skimmed liquid tends to be on the yellow side; over time this can increase the salinity of the saltwater and would need to be monitored constantly. However, the ability to make adjustments is beneficial since certain corals and invertebrates require a specific and stable salinity. This protein skimmer is easier to maintain and clean and very rarely will the airline clog up with calcium and salt deposits because the air tube tends to be larger than the venturi-style protein skimmer.
I am using a Coralife Super Skimmer 65. Although this skimmer is rated for aquariums at 65 gallons, the space I had available would not allow the 125 model, but I have found it is working very efficiently. After setting up this aquarium, it turns out that the substrate and live rock displacement of water and the extra holding capacity of the sump brings my total water volume to approximately 70 gallons so this skimmer turns out to be just the right size.
5) Chemical Filtration Reactor
At some point there may be a need to use chemical filtration for the health of the saltwater reef ecosystem. This typically occurs when there is need to use carbon to filter out impurities e.g. removing a disease or cyanobacteria treatment chemical, or to reduce a phosphate build up from feeding. In the Saltwater Setup Part 2 article I will touch base on water chemistry testing, and there, understanding chemical filtration will become much more apparent.
The chemical filtration reactor unit can mount to the side of the sump or be put directly in the sump. A small, low flow pump, moves water through a dispersion plate, which in turn allows for the water to evenly flow through the chemical filtration media before it finally returns to the sump. My primary use of this unit is to remove unwanted phosphate and silica from the water column. Phosphate is primarily responsible for nuisance algae growth. Silica is primarily responsible for diatom and cyanobacteria growth. These animals, bacteria, and plants, can in turn harm the reef since their prolific growth can choke out and shade delicate slow growing coralline algae and corals.
My reactor of choice is Two Little Fishes Phosban Reactor 550 along with a 2-liter container of Seachem Phosguard and a Marineland Maxi-Jet Pro 900 pump with a flow control valve as my primary phosphate and silica removal system.
6) Heater and/or Chiller
Let’s begin this section by stating that the average reef temperature is 77 degrees Fahrenheit. Some reefs can be lower by 4 to 5 degrees, whereas other reefs may be 4 to 5 degrees higher. This can correlate to seasons or just the general location of the reef depending on how close to the equator it is located. A reef that sits basically on the equator doesn’t really go through seasons but can still experience a mild swing in temperature. However, there is another aspect of temperature in saltwater that I recommend paying close attention to and that is the correlation between water temperature and pH. The higher the temperature in the reef aquarium, the lower the pH and vice versa, therefore, I recommend keeping the reef aquarium stable between 75 and 77 degrees Fahrenheit.
Keeping in mind the above recommendation, there is a decision to be made and it is based entirely on the geographical location and the ambient room temperature where the reef aquarium is set up. If the locale of the reef aquarium is in a warmer climate, then it may not need an aquarium heater, but rather a chiller and of course in the reverse situation the reef setup may need a heater. Remember that all the pumps the reef aquarium will have are going to put out an amount of heat just by their operation. Although this may delay setting up the reef aquarium, I would take a few days prior to the time the reef aquarium setup is to take place, and measure water temperature in a gallon of water. Each reading taken, add a few degrees to the reading, accounting for residual heat from pumps, and determine if a heater or a chiller is needed to keep the reef at a stable 75 to 77 degrees.
In what I have explained thus far about a heater or chiller, I have mentioned the word stable. Whatever temperature the reef aquarium is to be set to, it is imperative that temperature stay as stable as possible. What I mean by this is there shouldn’t be major temperature swings in a 24-hour period of time. Realistically, temperature swings shouldn’t exceed a degree or two in that period of time. Therefore, it may also be a good idea to have a heater and a chiller, especially if the reef aquarium is located in a climate that has decent seasonal swings such as a very cold winter and hot summers.
When it actually comes time to choosing a heater, the manufacturer’s typically label what wattage to aquarium size their heater will handle. When it comes to chillers, the manufacturer will label horsepower, or HP, or use BTU’s, as a way to determine what the aquarium needs to stay cool. Although the two chiller types I have used, JBJ and Coralife, have been durable and operate well within their stated parameters, I do have a recommendation for heater type. The heater types that are titanium-heating rods with a separate thermostat and controller are the heaters I recommend. The heaters that have these items built into one unit tend to fail more frequently with one type of failure risking the entire reef system. If this heater type fails where the thermostat doesn’t turn off the heating element when its suppose to, the heater can cook your reef. This type of heater will also fail in the opposite way with the heating element producing no heat, but this will not immediately kill your reef like the previous scenario. Either way, taking a chance with your reef system in this regard is not worth it and thus my recommendation for the titanium heating rod style heaters.
Within my reef system I am currently using a heater and chiller combo. I have chosen the JBJ 300 watt True Temp Titanium Heating System and a Coralife 1/6 hp Chiller. This is currently keeping my aquarium between 77.5 and 75.8 degrees Fahrenheit.
7) Saltwater Mix with Premix System
This is primarily a system that will come in handy after the reef aquarium has been installed and water changes will become routine. But it is extremely important if the reef setup has the live sand and live rock already in it before the fill happens. The topics of live sand, live rock, and substrate will be explained in the proceeding sections.
If the plan is adding the live sand, live rock, and additional substrate prior to filling the aquarium then a need to pre-mix the water and synthetic sea salt will be extremely useful. This should be done 24 to 48 hours prior to needing the saltwater as it takes that long for things to come to equilibrium. To set this system up you will need one or more holding containers, that will allow for the pre-mix of the volume of saltwater needed. New garbage cans, plastic 32-gallon, are the best. For each container you will need a pump to circulate the water and a heater to bring the water to the appropriate temperature. The all-in-one heaters are ideal for this situation because they are cheaper than titanium rod heaters and even if they fail it won’t kill anything. Fill each container, preferably with reverse osmosis water, but filtered water will do, start up the pump and heater, and slowly add the salt over about an hour or so to avoid clumping of the salt mix. Once all the salt has dissolved begin taking salinity readings and adjust if needed.
If the plan is on filling the system before adding the live rock, live sand, and substrate, there won’t be the need for this system. Just fill the aquarium and filter system with reverse osmosis or filtered water, get it running, and then add the appropriate amount of salt mix recommended to attain a specific salinity. Let the system run for 24 to 48 hours and adjust the salinity accordingly over the next day or two. Once the salinity is at the appropriate reading, then add the live sand, live rock, and substrate. Saltwater will need to be siphoned off and saved as these items are added so the system doesn’t overflow. This siphoned off water can be saved for the first water change when the reef setup is due for one.
There are many brands of sea salt mix on the market. Some are more expensive than others but cost doesn’t necessarily mean the sea salt mix is any better than the cheaper brands. I used Instant Ocean Sea Salt and have for many years which tends to be much cheaper then some leading brands. However, I have recently switched over to Live Aquaria’s Professional Sea Salt brand since the cost is equal to Instant Ocean’s but theirs is 50-gallons of mix for the same price. I have also tried a couple other brands and have found little to no difference in the readings of certain chemistry tests I have preformed.
8) Live Rock and Live Sand
First let me explain what it means by live rock and live sand. Live rock is actually the deposited remnants of calcium-based skeletons of corals and is what makes up the base of the reef that living corals grow on. Over hundreds, even thousands, of years, corals live, grow, and die in a cyclical nature that creates live rock. Although the rock is dead coral skeletons the reason for calling it live rock is because of what’s inside the rock itself. This calcium-based rock is very porous and allows water to slowly pass through it. As the water works its way deeper into the rock, it loses its oxygen content, but this is a good process because living within the depths of the rock are beneficial bacteria that love oxygen deprived environments. In the water column surrounding the reef are nitrogen-based nutrients that in high quantities will kill corals. As this water passes through the rock, these bacteria use the nutrients as food and eliminate the nitrogen. This process is called de-nitrification. This process is the primary filtration system for a reef aquarium.
The live sand, on the other hand, is very similar to live rock and has some significant similarities to live rock but also some major differences. Just as in live rock’s ability to denitrify the water, the sand can do the same but in depths that tend to be 2 inches or more. At this depth, the sand compacts down enough that there is a lack of oxygen. Therefore, the sand begins supporting the same bacteria found in the live rock. However, in the upper inch to inch and a half, in the sand bed, there is enough oxygen that bacteria, similar to freshwater aquaria, grow and remove nutrients. These bacteria are called nitrifying bacteria and to understand more about their process please read The Nitrogen Cycle. In addition to these bacteria in the upper sand bed, there are also micro crustaceans and critters that live here that feed on the collected detritus.
Now that there is an understanding about live rock and live sand, here are some tips to consider when setting up the reef system. The amount of live rock in a reef system should be about 1.5 to 2 pounds per gallon as a starting point. The rock should be in a variety of sizes, with the largest pieces being used as the base of the reef. I would recommend purchasing the live rock in bulk for a new reef setup. Although this will extend the time period between setup and wildlife addition, it will save a fair amount of money if there is a budget to stay within. This rock will be shipped, typically in a box, wrapped in saltwater soaked newspaper and is typically referred to as dry shipping. If this is the course chosen for the reef setup, skip purchasing the live sand until the tank has cycled. The water chemistry during this cycling phase will typically kill much of the beneficial organisms in the live sand. The cycling process will last for about 1 to 2 months and a water change must be performed before adding the live sand. A water change in this scenario should be 30 to 50% of the total water volume.
Place the largest live rock pieces directly on the bottom of the aquarium with the flattest side resting on the glass or acrylic. The smaller rock pieces will eventually rest on these larger pieces to create some flat spots where coral pieces can rest. But hold off on placing any rock on top of the base pieces until the substrate has been added to create the required bed depth.
NOTE: Before continuing the live rock placement, please read the section below entitled Substrate and Reef Mud, as these two topics are tied together during installation.
Create some high and low spots using the smaller rock pieces, since some corals thrive in stronger light exposure and others in lower light. It is best not to fill all voids between rocks with more rock because almost all saltwater fish retire into the reef at night; spots like this are perfect for nighttime. Also, if all the nooks and crannies are filled with rock, there will be a lack of water flow in these areas that will create dead zones. These places are where chemistry issues may arise with regards to pH and pathogens can thrive creating a potential to infect the wildlife within the reef. After the reef base of live rock has been created, any left over live rock will now be placed in the sump where there are empty spaces between the other gadgets in the sump. If some of these live rock pieces are too big to fit in these empty spaces simply use a hammer and chisel to break them up into smaller pieces. Perform this activity in a bucket or plastic bin so that all of the pieces can be collected easily and placed within the filter system.
Getting the reef started, however, will require a tenth of the total water volume in live sand. If the reef was setup up using live rock stored in an aquarium, and not “dry shipped”, then the cycling process will only be about two weeks, at most, and the live sand can be added immediately after the live rock and substrate bed is in place. The section below will discuss substrate and this will be the sand depth needed for the reef. If the live rock used in the reef setup was “dry shipped”, the live sand will then be sprinkled on top of the substrate bed after the aquarium has cycled. As mentioned above, the cycling process for “dry shipped” live rock reef setup will be 1 to 2 months and must include a 30 to 50% water change before adding the live sand.
My reef system has approximately 115 pounds of live rock, which works out to a 1 to 1.6 ratio of water volume to live rock. I used 8 pounds of live sand to seed my substrate bed, which is approximately 3.75” thick.
Below are links to reef rock but this type of rock is not considered live rock. It is still reef rock, but has been dried out and cleaned. It is usable for setting up a saltwater reef aquarium but it will take a considerably longer time, 6 to 8 months, to cycle the aquarium. Although this rock will eventually culture the beneficial bacteria I mention, it is recommended that some live rock be added to the setup to begin this culturing process. I am supplying these links because this would be considerably less expensive than stocking the reef setup with 100% live rock. To find true live rock, check your local pet store or take a look at what LiveAquaria.com has to offer.
Reef Rock:
Live Sand:
9) Substrate and Reef Mud
Substrate is just another word for sand bed, but using the phrase “sand bed” can be a misnomer because there are a variety of substrates that are not specifically sand. However, when picking the appropriate substrate I would recommend a substrate called oolith sand. It is a fine-grained calcium based substrate and there are a few reasons for choosing this type of substrate bed.
One is, it allows for easy passage of substrate bed dwellers such as snails and sand sifting stars. Another reason, is this type of substrate bed requires less depth to culture the oxygen deprived de-nitrifying bacteria; typically 2 to 3 inches is adequate. Finally, the amount of calcium dissolved into the water column from this type of substrate bed is greater because of the larger surface area exposed in comparison to a larger grained substrate bed.
However, if it is preferred to have a larger grained substrate bed then look for an aragonite-based substrate. The larger the grain, the deeper the bed must be, so I recommend, regardless of the substrate used, the bed should be 3 inches deep.
Here is a substrate calculator to use that will indicate the amount, in pounds, needed for the appropriate substrate bed depth.
Remember, that the live rock, placed first on the bottom of the aquarium, is going to take up some of this total given for the substrate bed. Therefore it may be necessary to scale back the total amount so there is not an excessive amount of left over substrate. However, a small amount of left over substrate is not bad because my next topic, reef mud, will require the use of this excess.
As stated, in the above section on live rock placement, once that is complete, now the substrate can be used to fill in around the live rock. Use a cup to pour the substrate around the base live rock and use a butter knife or chopstick to get the substrate to fill in the unreachable areas. I would also recommend using some saltwater, poured into the substrate bed to help level out the substrate around the live rock pieces.
Refer to: Live Rock & Live Sand.
In the Live rock section above, I started out with a little education on why its called live rock and what it does for the reef. Remember I spoke about the de-nitrifying bacteria and what it does. What I didn’t mention and saved for this section is that the de-nitrifying bacteria is limited to how much nitrogen it can break down, by a key element in the water column, carbon. Carbon is very limited in an artificial saltwater reef setup and to have the de-nitrifying bacteria work at its most efficient, adding a source of carbon is highly recommended. This is where the reef mud comes into use as it is a synthetic blend of sediments that mimic the carbon rich coastal mangrove, sea grass, and macro algae environments located near many coral reefs in the world.
The reef mud setup incorporates a plastic container, typically a few inches in depth and having dimensions that will allow it to sit in the bottom of the sump. Once the appropriate sized container is found, fill it half to three quarters full of reef mud and then place a half inch, or so, layer of substrate on top. Then place the container in the sump away from direct flow of water so the reef mud does not disperse into the water column. If the filtration system being used is not of a sump type, I recommend using a fine mesh nylon bag placed somewhere in the filtration mechanism but not directly near the input or output areas of the filter. This will ensure the reef mud is not dispersed into the water column while the filter is running. Regardless of the type of filtration being used, it would be wise to place this reef mud container somewhere it is easily accessible. The available carbon in the reef mud will eventually get used up and will have to be replaced; typically this occurs about every 4 to 6 months. In the Saltwater Setup Part 2 section about test kits I will get further into what to look for when the reef mud is ready to be changed.
My reef system started with a 4-inch oolith sand bed, which has now compacted down to about 3.75 inches. I am using a 4-inch deep 13 by 9 inch plastic container with a full 1-gallon Caribsea Refugium Mineral Mud. On top are small, relatively flat, pieces of live rock placed in such a way they literally cover the entire surface of the refugium mud. I have placed this container on the bottom of the sump right below the direct flow. However, the live rock creates enough of a barrier the reef mud is not kicked up into the water column.

Substrate:
Refugium Reef Mud:
10) Circulation Pumps and Wave Maker
Ocean currents move to and fro within the reef environment as the swells move toward land. There is no singular direction of water current, if at all. The water current is more in a circular motion that moves from top to bottom and back toward the top. Corals and invertebrate filter feeders rely heavily on this type of current to bring food to them. So it is highly recommended that this type of water current is correctly simulated within the reef aquarium environment. There are a few things that can be done to attain this kind of water movement within the reef setup.
First and foremost, it would be wise to point the filter system outputs away from directly blasting onto any coral or live rock base where corals may be placed. Using a spray bar or adjustable output flare nozzle, such as the type Loc-Line makes, the output flow can be pointed towards the sides of the aquarium or at the very least away from the corals directly. The output flow, once it is pointed toward the sides of the aquarium, will bounce off those sides and create a circular motion of water current.
Secondly, although in smaller tanks using only the output flows to simulate circular water current may be adequate, in larger, longer, aquaria this may not be sufficient. Therefore, the use of circulation pumps may be needed to create this circular water current the corals require across the entirety of the reef aquarium. Circulation pumps are unlike powerhead pumps, although these can be used but, as I stated above, these types of pumps will require an adjustable output or flare nozzle to produce a similar effect specific to circulation pumps.
Finally, if the reef setup will be using powerhead or circulation pumps it may be wise to incorporate a wave-making device. This unit allows for the pumps to be plugged into this device. Then it will switch the pumps on and off, for a set period of time, in an oscillating manner. This, in turn, will more accurately simulate the to and fro movement of water currents typically experienced within a reef ecosystem. Even with such devices, the pumps can actually be pointed directly at corals on the reef aquarium, as certain species, specifically SPS corals, do like direct flow of water, just not on a constant basis. Wave makers, in this regard, allow for this on and off again, direct water flow this type of coral desires.
If the reef setup will be incorporating a wave maker, do the research for this device first. Most wave makers can be hard on pumps that are not designed for an on and off type of operation. The wave maker manufacturer will either have their own pumps to go along with such a device or it will make recommendations as to what pump works well with their wave maker unit.
My reef setup currently uses a Red Sea Wavemaster Pro pump controller. I have incorporated 4 Hydor Koralia Evolution circulation pumps with this unit. There are two Koralia 1150 gph pumps at the top, on the right and left side walls, toward the back of the aquarium. Two other Koralia 600 gph pumps at the top, on the right and left side, toward the front of the tank are the others connected to this unit. The pumps are aimed to blast water across and above the reef, with each 1150 pump pointed diagonally toward the opposite 600 pump. There are a few benefits to this unit: 1) the ability to adjust, generally, how often and how long each pump turns on and off, 2) an automatic timer mode that decreases the water movement meant to simulate a natural nighttime downturn, and 3) a feeding mode.
Also, in the very first section of this article, Aquarium, Stand, and Backing, I pointed out the return size pipe, which is 3/4″. This 3/4″ return is split into 4 flare nozzle outputs using the 1/2″ Loc-Line system. The two front nozzles are pointed toward the front of the aquarium. The right and left nozzles are pointed down along the back of the aquarium and are providing the desired flow for two SPS corals.

Although this is not the wavemaker I have in my tank, which I could not find through Amazon, these wavemaker controllers look to be a suitable substitute for what I recommend in this section.
The controllers below come with one pump per controller:
This wavemaker controller does not have pumps included but can take up to three circulation pumps per controller.
Circulation Pumps:
Loc-Line Return line and nozzle:
It is recommended that the Loc-Line assembly pliers be purchased as well for the Loc-Line system.
11) Auto Top Off System
In aquarium situations, evaporation of water creates a constant need to top off the water lost over time. But in a saltwater situation, the need to keep the water level at a constant is a daily battle. The reason being is that in a saltwater situation, the reef ecosystem relies heavily on a set salinity that does not change drastically or exceed a healthy threshold. When water evaporates in a saltwater system, that water does not take with it any of the salt content within the water column and therefore the salinity can increase beyond what is healthy for the ecosystem. Adding freshwater on a daily basis is the only option to keep the reef salinity at the desired level, constantly. Therefore, it would be wise to incorporate an automatic top off system that will add the necessary water needed to keep the salinity constant over a period of time. This system, of course, needs to be filled from time to time but the daily requirement is eliminated.
Another benefit of a system like this would be the ability to premix some of the additives required for daily reef ecosystem upkeep. Those additives will be touched upon in a topic in the Saltwater Reef Setup Part 2, but I also wanted to point out this additional advantage when it comes to an auto top off system.
However, in most auto top off systems, it is only the unit and the float sensors that are provided. An additional pump and the plumbing necessary to deliver the water to the reef system must be purchased separately. Research the auto top off unit first to know what is provided and what must be purchased so that the unit is fully operational at the time of installation.
I am currently using a JBJ Auto Top Off (A.T.O.) Water Level Controller. In addition to this unit, I am using a Maxi-Jet 600 powerhead pump and the appropriate sized vinyl tubing to supply the water to the sump when the unit indicates the aquarium needs water added. The top off pump sits within a 5 gallon holding container of treated freshwater. As I have used the term “treated freshwater”, which I will further explain in the Water Conditioners & Additives section in the Saltwater Setup Part 2 article, I have also added a circulation pump in this bucket. This is so that the sediment within those additives stays mixed within the water column and does not settle to the bottom of the bucket. [create a link here that allows the reader to go to Saltwater Reef Setup Part 2 at water conditioners and additives section about kalkwasser]

I hope this information has been useful in helping to setup a saltwater reef system. Now while the new saltwater reef system is cycling and before wildlife is added to the reef, please take the time to read the sections within the Saltwater Reef Setup Part 2. There I will talk about testing equipment, water conditioners, additives, corals, fish, invertebrates, and feeding.
Saltwater Reef Setup Part 2, coming soon!